︎︎︎ Setting up the Scene in C4D
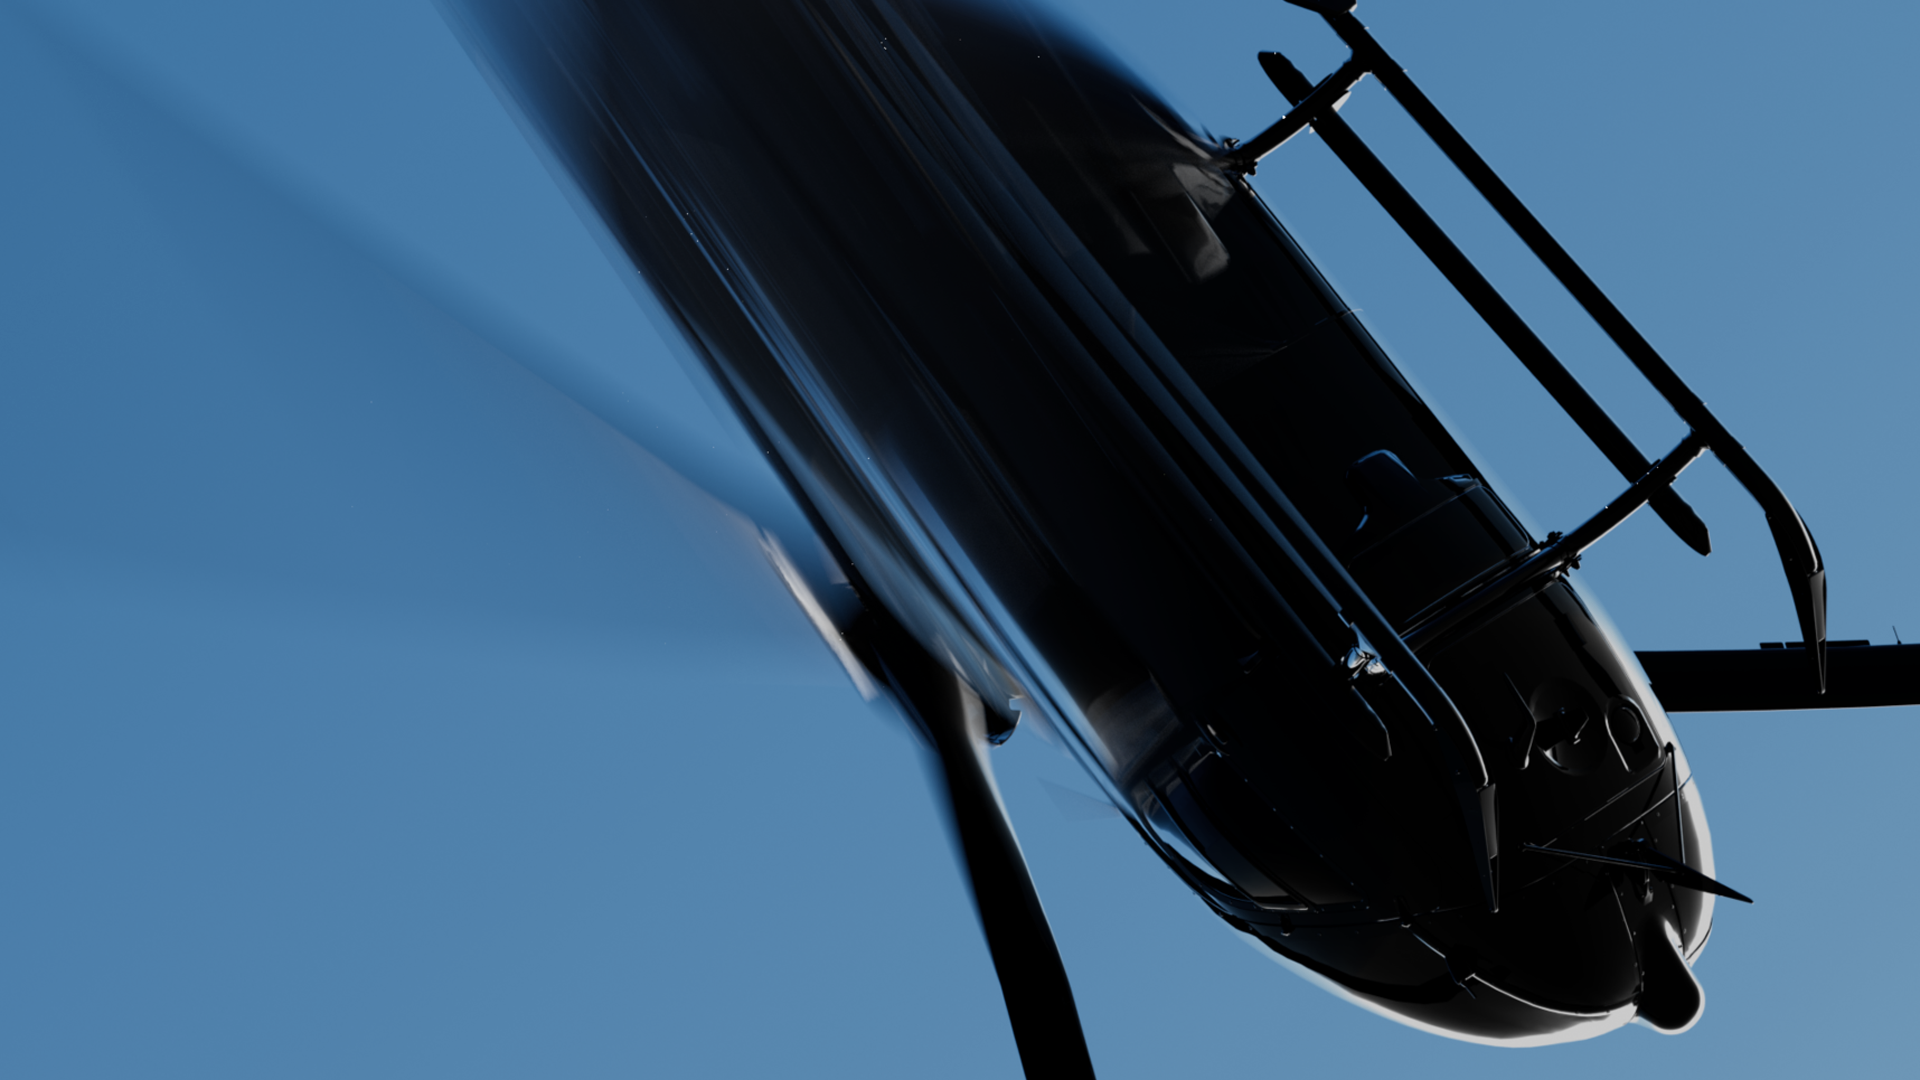
Starting with a fresh C4D scene, all we need is some polygonal geometry to work with. In my example I’m using a complex model of a helicopter consisting of multiple single parts, but the nature of the model is up to you. Just keep in mind that the heavier your model, the heavier any render calculations will get — based on some trial & error, it seems that very dense meshes might cause Octane to crash and lead to instability, as motion blur is tied to the density of the input meshes and also quite taxing on your system’s vram.
Since my model consists of multiple single parts, I’m using a Connect object to nest these parts into a single model, which will be helpful once we start adding Vertex Maps in a bit.
Make sure to uncheck Weld inside the Connect object and leave every other parameter as is. This will ensure that there is no unwanted alteration happening to your input mesh(es).
If you want to test the effect on a single object, you don’t need to use a Connect object necessarily; however, I find it to be good practice to use it anyway, as it can sometimes resolve unexpected issues at render time. It also seems to be helpful for more complex hierarchies like Fracture objects and Mograph Cloner setups where the motion blur technique might only work when everything is nested inside a Connect generator — «when in doubt, drop down a connect object».

︎︎︎ Vertex Maps, Fields and Camera (Octane)
For our effect to work, we need to add a stack of 3 Vertex Maps to our geometry
—
in this case, to the Connect object. Make sure to give them unique names — for now, we will just call them “X”, “Y”, “Z”:
![Name your Vertex Map]()
![Vertex Map stack]()
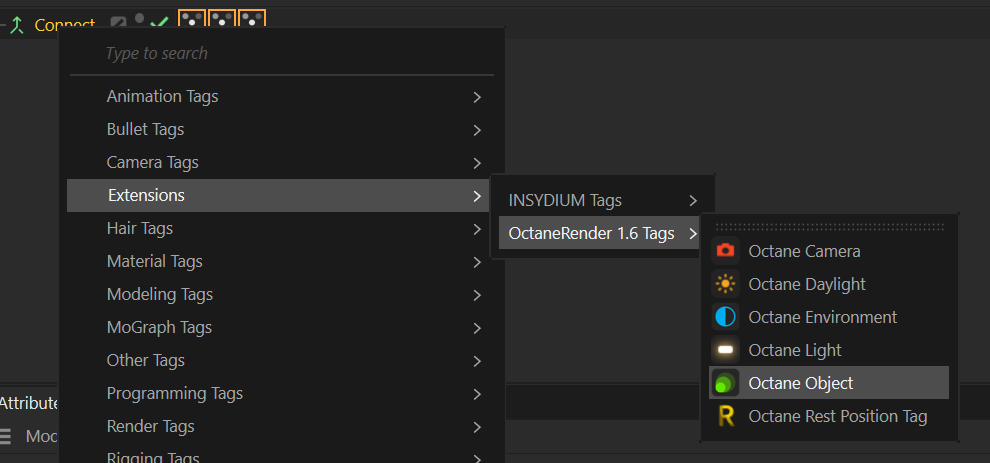
Next, we will need an Octane Object Tag, which we will add to the object as well.
Inside this tag, move to the Motion Blur section, set Enable motion data to Vertex speed. Now you will be able to link the 3 Vertex Maps into the corresponding slots for Speed_X, Speed_Y, and Speed_Z:
![Octane Object tag]()
![Vertex Speed and linking Vertex Maps]()


Next, we will need an Octane Object Tag, which we will add to the object as well.
Inside this tag, move to the Motion Blur section, set Enable motion data to Vertex speed. Now you will be able to link the 3 Vertex Maps into the corresponding slots for Speed_X, Speed_Y, and Speed_Z:

We can now start to add fields to make use of the Vertex Maps. To keep things simple during testing, let’s add a Spherical Field, which will be used in each Vertex Map simultaneously. Note that since the Vertex Speed channels correspond to separate vectors, it’s possible to add different strengths per vector (vertex map), or even add totally unique field stacks per vector for experimenting.
Of course, you can also work with Group Fields, etc., if you want to keep things tidy — it’s totally up to experimentation.
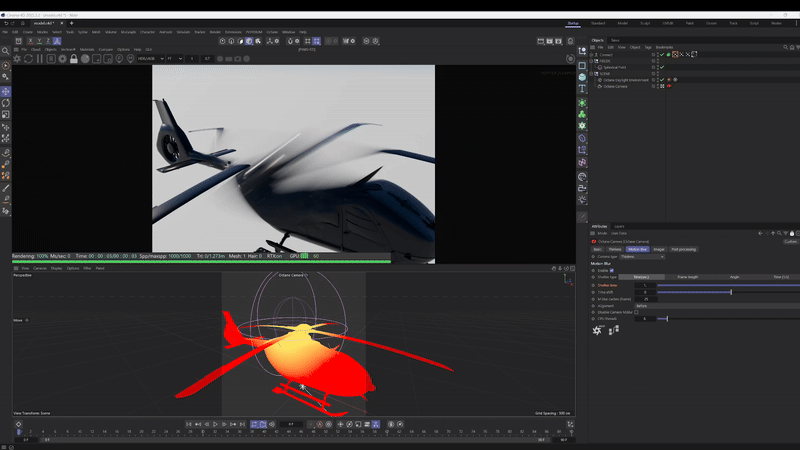
Let’s proceed with adding an Octane Camera to our scene, and while we’re at it, let’s also create some lights and add some fancy material to the geometry.
The last step to make our blur work happens in the Octane Camera:
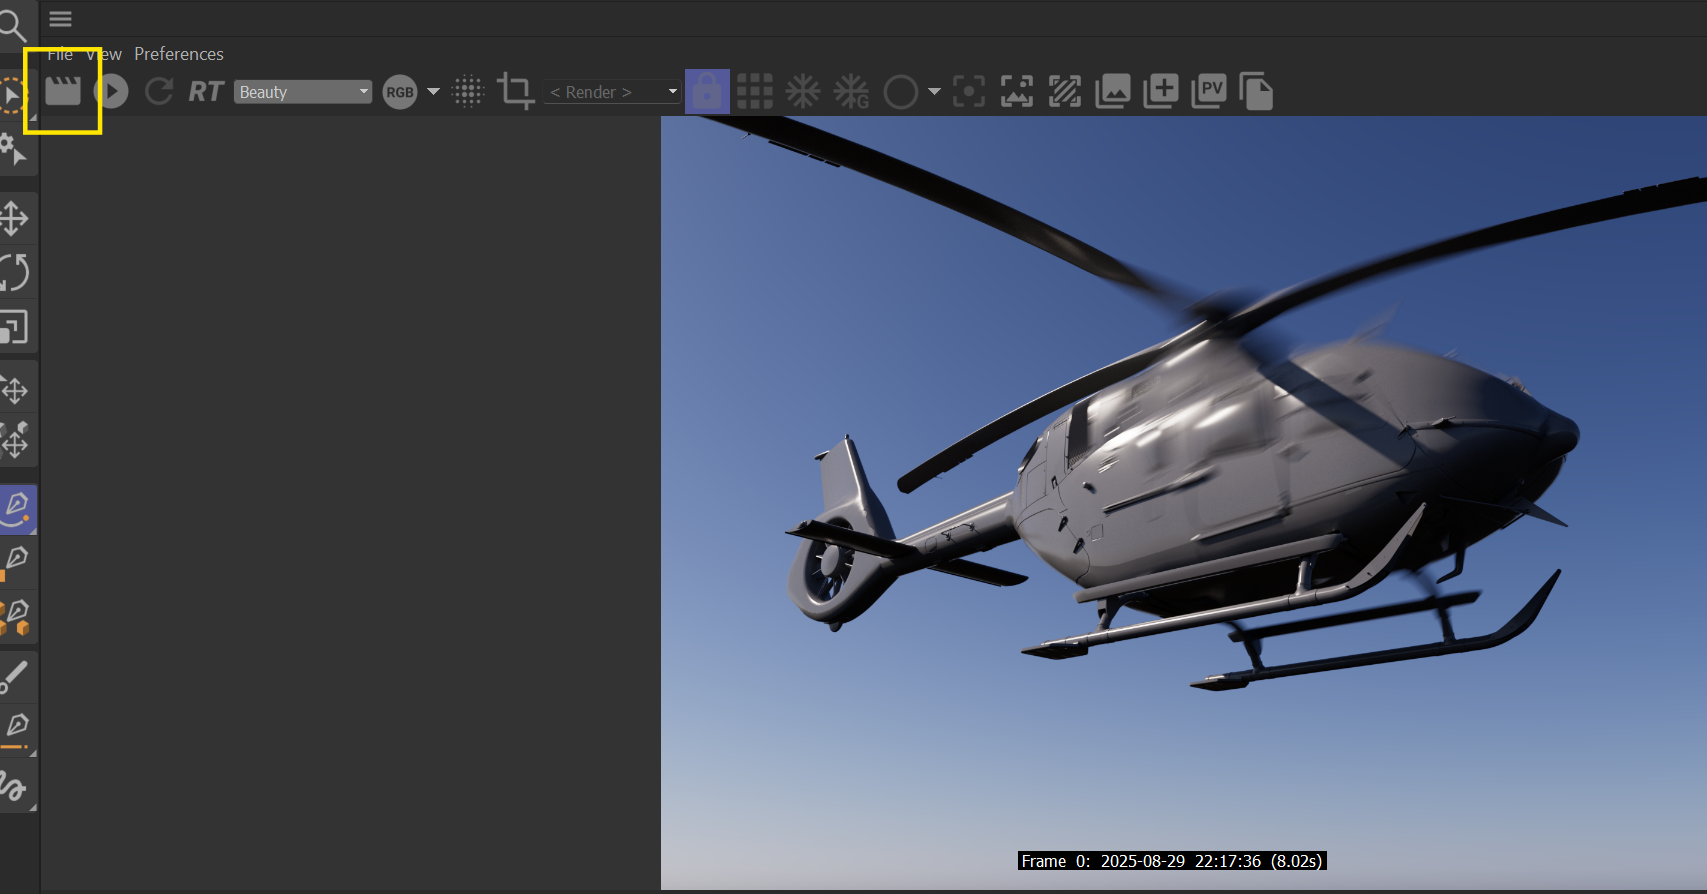
Navigate to the Motion Blur section, check Enable. For a start, let’s also set the Shutter time to a value of 1:
![Octane Camera settings, experiment with different shutter speeds and types]()
This is the core of it. You can also experiment with setting keyframes for animation, different fields, different Shutter Types, and so on to get a feel for the effect and be able to art direct it to your liking and needs.
The nice thing about Octane Render in C4D is the fact that the motion blur previews “live”, so there’s no need to render to disk or picture viewer to get immediate feedback on what is happening (which is unfortunately the case with Redshift in C4D at the time of this writing...).
Of course, you can also work with Group Fields, etc., if you want to keep things tidy — it’s totally up to experimentation.
The 3 vectors are in relative space to the geometry to which they are applied, not relative to screen-space or world-space. I find this actually creates more control over the effect and allows the possibility to separate the blur from the rest of your scene — and also from the camera angle and position. I think this really adds to the flexibility of the technique, and it might be good to keep in mind.
Let’s proceed with adding an Octane Camera to our scene, and while we’re at it, let’s also create some lights and add some fancy material to the geometry.
The last step to make our blur work happens in the Octane Camera:
Navigate to the Motion Blur section, check Enable. For a start, let’s also set the Shutter time to a value of 1:

This is the core of it. You can also experiment with setting keyframes for animation, different fields, different Shutter Types, and so on to get a feel for the effect and be able to art direct it to your liking and needs.
You might want to adjust other scene elements and exclude them by disabling Motion Blur in their corresponding Octane Object tags. This might also apply to the Octane Camera, in case you need consistent camera motion blur separately from the zoned blur effect on your object — I’ve not tested such cases yet, but it might be a caveat to keep in mind. In short, there are probably ways to separate camera motion blur from object motion blur in both RS and Octane.
The nice thing about Octane Render in C4D is the fact that the motion blur previews “live”, so there’s no need to render to disk or picture viewer to get immediate feedback on what is happening (which is unfortunately the case with Redshift in C4D at the time of this writing...).

︎︎︎ Applying the Technique in Redshift
The way to create this zoned blur effect in RS is actually quite similar. We can keep the Vertex Maps and Fields we created previously; we only need to swap the Octane Object tag for an RS Object tag and work towards the shutter speed using the RS render settings.
Unfortunately, as far as my understanding goes, RS can’t display motion blur “live” during IPR (progressive/bucket) in Cinema 4D. That said, the RS IPR in Houdini actually seems to be able to display it “live”, which is awesome to get that quick raw feedback.
The following settings in the RS Object tag are of interest to us:
Under Motion Blur, enable Override, set Motion Blur to Transformation and Deformation, set Motion Vector to Enabled, and link your Vertex Maps into the corresponding slots. The main difference here compared to Octane is the Scale parameter, which seems to affect the strength of the overall blur (feel free to experiment with values above 1):
![Setting up the motion vectors inside RS Object tag]()
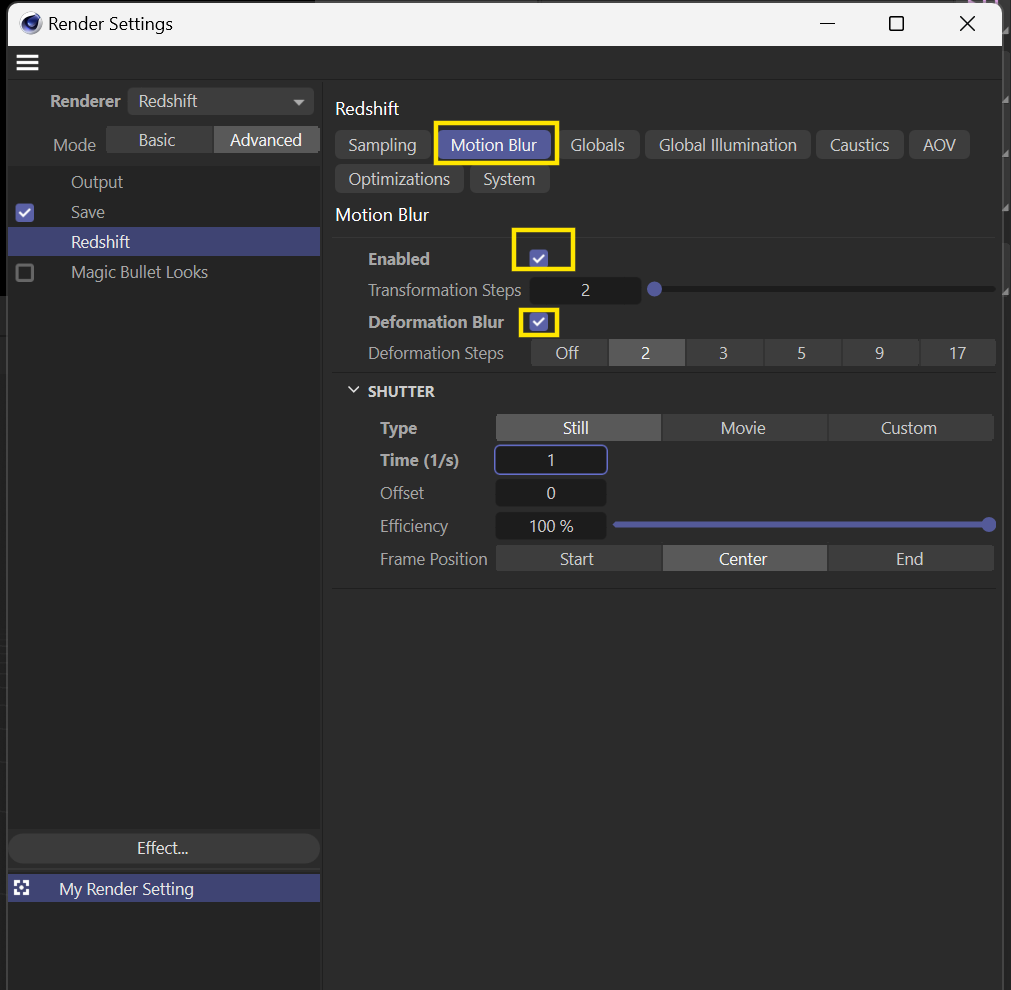
The second important step is to activate Motion Blur in the RS render settings (also enable Deformation Blur). This tab also contains the Shutter Types and strengths you may want to play with.
Depending on your needs, it might be better to keep the Shutter speed realistic and workable for your project, and instead use the Scale parameter inside the RS Object tag to drive the blur effect separately from other scene elements and camera movement.
![RS Render settings, experiment with different shutter speeds and types]()
![Preview the blur via this top-left button on RS IPR or render to Picture Viewer]()
Unfortunately, as far as my understanding goes, RS can’t display motion blur “live” during IPR (progressive/bucket) in Cinema 4D. That said, the RS IPR in Houdini actually seems to be able to display it “live”, which is awesome to get that quick raw feedback.
The following settings in the RS Object tag are of interest to us:
Under Motion Blur, enable Override, set Motion Blur to Transformation and Deformation, set Motion Vector to Enabled, and link your Vertex Maps into the corresponding slots. The main difference here compared to Octane is the Scale parameter, which seems to affect the strength of the overall blur (feel free to experiment with values above 1):

The second important step is to activate Motion Blur in the RS render settings (also enable Deformation Blur). This tab also contains the Shutter Types and strengths you may want to play with.
Depending on your needs, it might be better to keep the Shutter speed realistic and workable for your project, and instead use the Scale parameter inside the RS Object tag to drive the blur effect separately from other scene elements and camera movement.
︎︎︎ Houdini & Redshift
To apply a similar blur effect in Houdini, we can directly work with the velocity (@v) attribute and apply noises and masks to it, it feels actually even faster than working with Vertex Maps in C4D.
Drop down a Redshift ROP and set up the Motion Blur similarly to how we did in RS for C4D. Under IPR, also check Live SOP Level Updates (Deformations/Volumes/Instancers/Proxies), this will be helpful to get faster SOP updates when you change your velocity vectors while RS is running.


This time I’m using the template head as a test geometry, simply drop work on your geometry on SOP level and make sure it’s in its own container (I call this one “blur_geo”).

The easiest and quickest way I found to drive velocity vectors is by dropping down an attribute noise SOP, set the attribute to “v” and play with the Noise Value and Pattern Values. Zero Centered range values combined with a small element size seem to give an interesting base for the effect. Of course you can create your velocities a different way and go deeper with animating the attribute etc. It’s good to visualize our @v attribute to see how the noise behaves.


Similar to the tags in C4D, it’s important in Houdini to tweak some things on the geometry container. Once the geo container is selected, go to Redshift OBJ — Settings — Render and make sure to check Mesh Deformations Blur From Velocity Attribute. This will pick up the velocity (v) attribute by default. You can drive the overall strength of the blur by changing the values in Frame Duration Scale. This is similar to the Scale parameter we used in RS for C4D.

Start the RS Render View (progressive or bucket mode, should not matter) and you should see the blur working. Move your camera around to check if the directions actually follow the vectors properly.

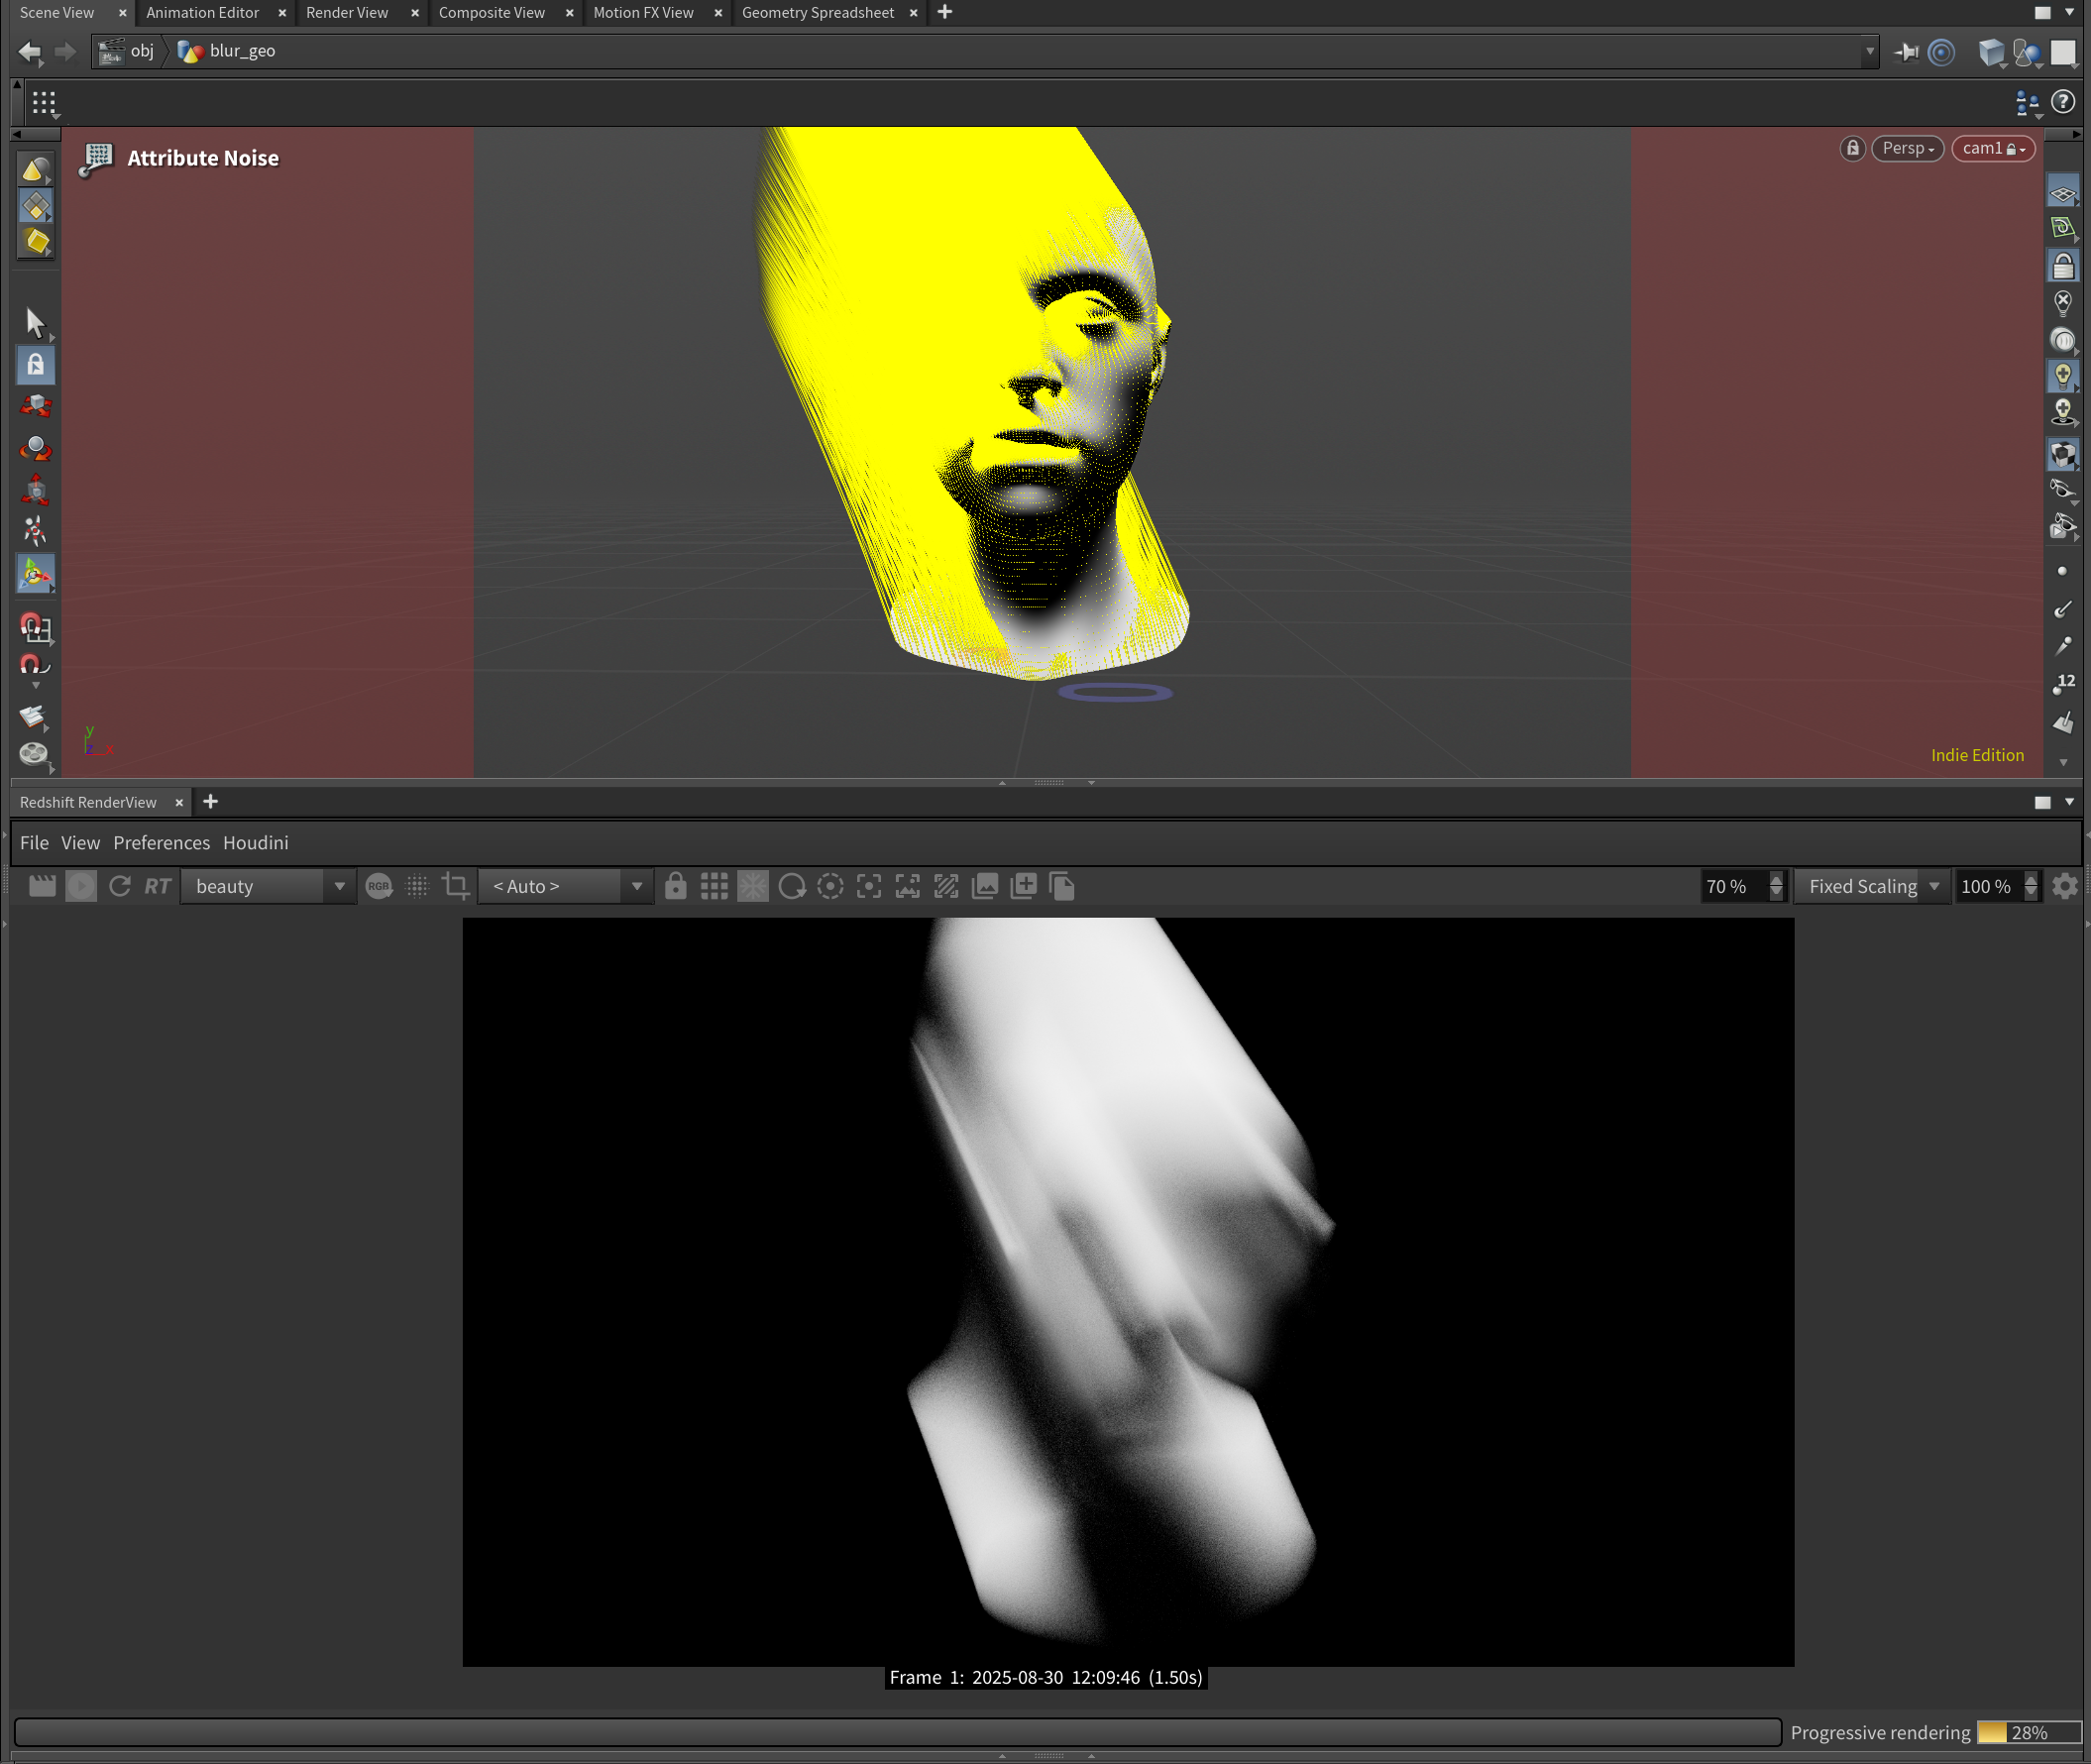
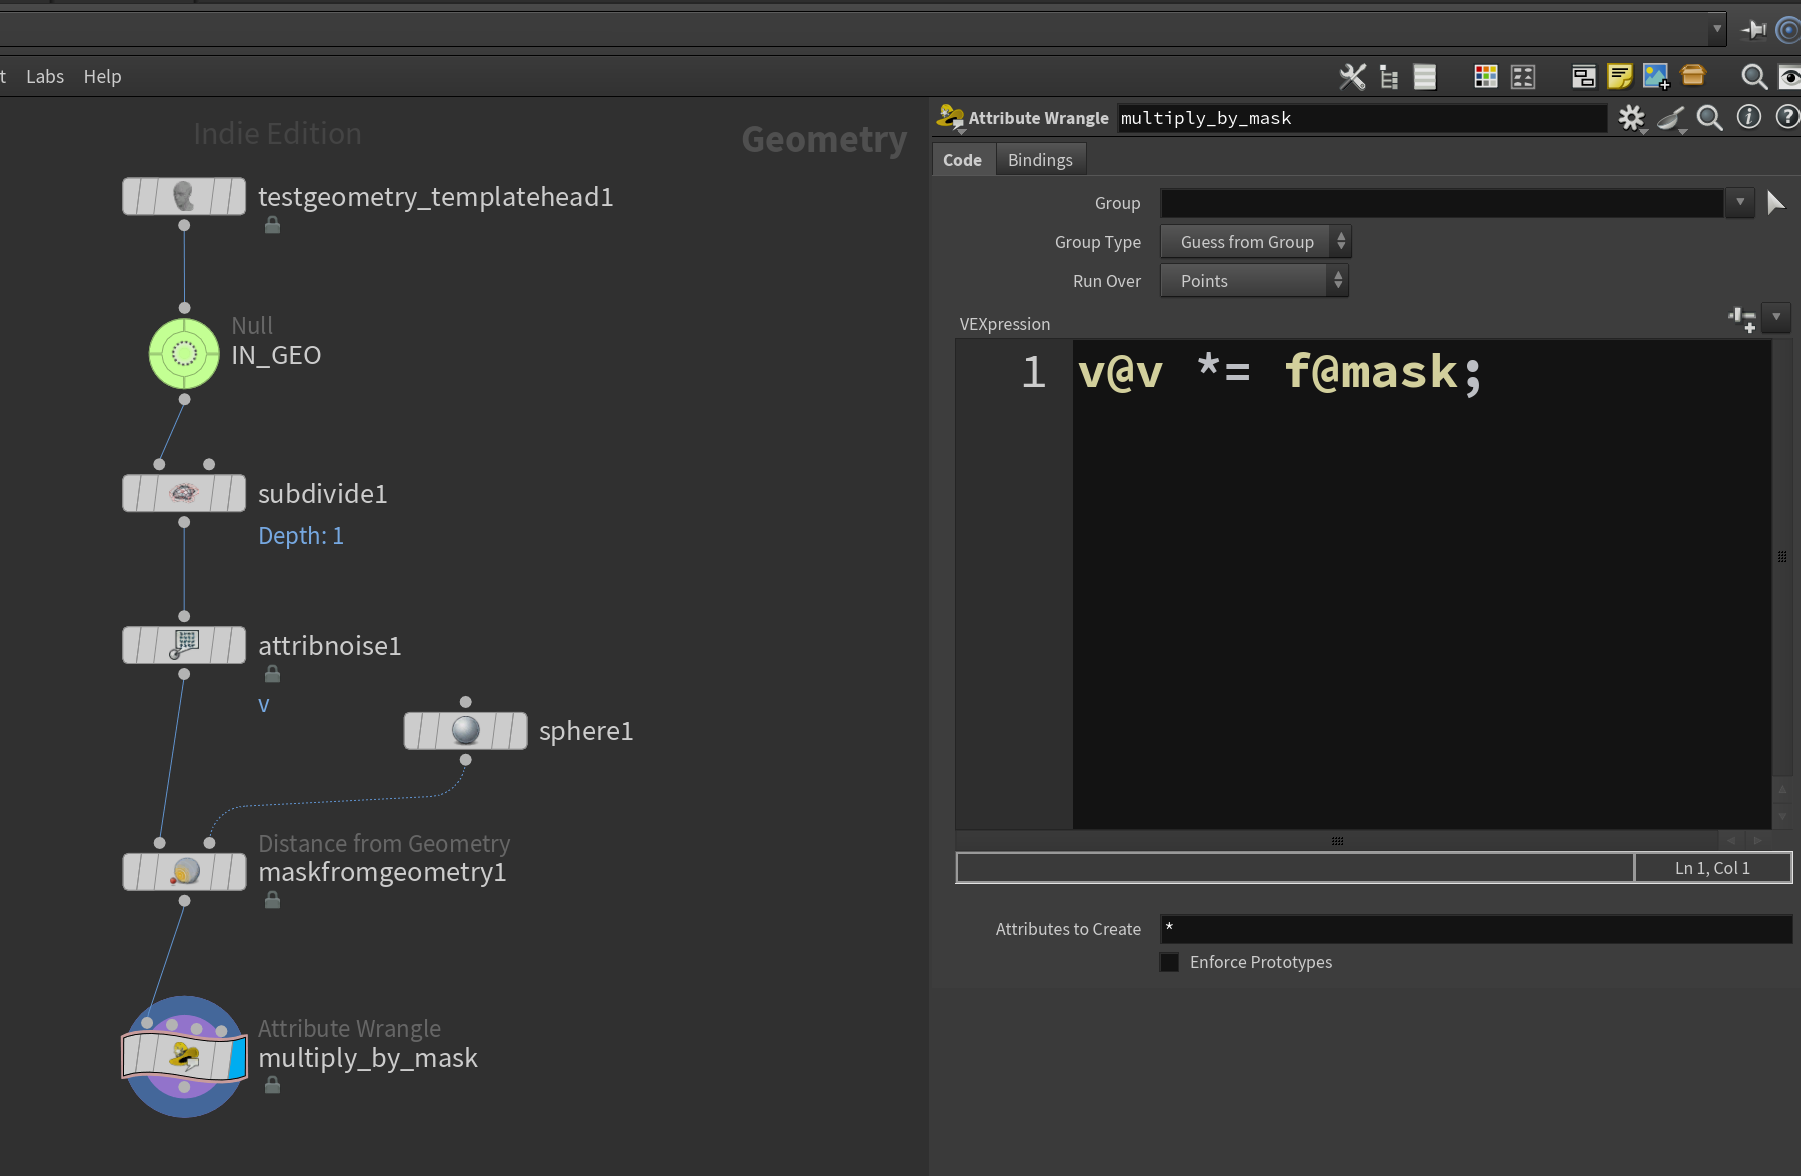
If you want a bit more control over your blur zones, a simple way to do this is via dropping down a Mask From Geometry SOP and use a reference geometry to create an f@mask attribute on the head.
Also drop down an attribute wrangle at the end for multiplying the velocities with the mask.
A simple vex code to do this is: v@v *= f@mask;
With the velocities still visualized, you should now get immediate viewport feedback on the zones where the blur will take effect on the mesh:

That’s a fast way of tackling a similar controllable blur inside Houdini - arguably even faster than in C4D and with the mentioned benefit of having faster live display on how the motion blur will look and feel. Also, since you have access to actual 3D vectors it might open up more possibilities for more complex blur shapes compared to C4D’s vertex maps which are more limited to the mesh surface.
︎︎︎ Closing Thoughts
Hopefully, you will find use cases for these techniques. I think it opens up a big playground for introducing a more organic feel into rendered images and sequences, breaking up the digital look here and there or just for experimenting with different looks.
I reckon the Motion Vector channels in these render engines were probably created mainly with liquid mesh velocities in mind, but why not take it a step further and use them for breaking up your image in interesting ways?
︎︎︎ Links & Resources
— More in-depth tutorial on the technique with C4D + RS (KAKTAK): youtube
— Alternative technique via COPs in Houdini (nscr): youtube
— How Wong Kar-Wai Visualizes Time (In Depth Cine): youtube
— More Step Printing References (Eyecandy): eyecannndy.com
— Personal Example using the Technique: instagram